W2DRZ Controller Support Web

Welcome | Overview | Controller | Encoders | DrzTrack | Products | Services | Download


Tracking with F1EHN

The 
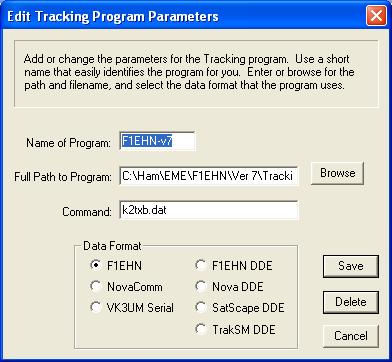
F1EHN Tracker interfaces with the CT-2 controller board directly via the serial port in your PC.  The program name is "Tracking.exe", or you may use "Launcher.exe" if you have Version 6 or 7 of the F1EHN tracker.  Also, with version 6 or 7, when using with Tracking.exe, be sure to specify the name of your data file in the 'command' field as shown in the screen shot.  This will allow bypassing the Launcher and going straight into the tracking program.  Be sure to set the data format to F1EHN also.  For the older F1EHN version, you can also make a program setting for the F1EHN setup program in the DrzTrack programs list.  The program name to use is "emesetup.exe".  This will allow you to make configuration changes for the F1EHN tracker without leaving the DrzTrack program.  Make sure that the port and baud rate settings for the F1EHN program are set correctly.

When you are ready to start tracking, start communications from the DrzTrack program to make sure the board is operational and movement is enabled.  Use the reset button if necessary.  Make sure the selected tracking program in the tracking window is F1EHN, and then click the "Run" button.  The DrzTrack program will minimize and the F1EHN Tracker will start.  Double click on the correct setup file in the F1EHN initial window and the tracking program will start.  (If you are using version 6 or greater of the F1EHN Tracker then you can put the name of the data file as a command in the DrzTrack program setup window.  Then the initial setup window of Tracker will be bypassed and you will go immediately to the main screen and start tracking.)

If you get a communications error message, exit and then recheck that the controller is operational from DrzTrack and that the F1EHN setup has specified the correct COM port and speed.  While the F1EHN tracker is running, the DrzTrack program will remain minimized and unresponsive.  As soon as you exit from F1EHN Tracker, the DrzTrack program will restore itself to your desktop so you can use it again.

Study the F1EHN documentation for the details on operation and parameter settings.  Note: In F1EHN, the elevation setup should always be set to 0-360 degrees when using with the CT-2.  Set the CT-2 encoder parameters to 0-90 or whatever you need.


Tracking with Nova
In the DrzTrack program setup window, add the Nova for Windows program and location.  The file name is "NFW32.exe".  Set the data format to Nova DDE.  When using DDE, the DrzTrack program continues to communicate with the CT-2 controller via the serial port, so it is important that Nova does not also attempt to use the serial port.  Bring up the Nova program, and set the "Antenna Rotator Setup" to use "DDE Only" as the interface.

When you are ready to start tracking, start communications from the DrzTrack program to make sure the board is operational and movement is enabled.  Use the reset button if necessary.  Make sure the selected tracking program in the tracking window is Nova, and then click the "Run" button.  The Nova for Windows program will start and tracking will begin in the paused condition.

Now you can switch to DrzTrack, or minimize Nova so that you can see the DrzTrack screen.  The tracking status message will show that tracking is Paused, and it will show the satellite being tracked and the current position as reported by Nova.  It will also show the current antenna position, and the LED indicators will show motion requests and commands as they are generated to keep the antenna in track.


Note that Nova is showing Sun azimuth as 166.2 degrees but the antenna is at 153.99 degrees.  The antenna motion indicator points left, indicating that the antenna is being moved to correct the difference.  You may click the "Stop Tracking" button to temporarily stop receiving tracking information from Nova.  While Tracking is stopped, DrzTrack will continue to show the current moon and antenna positions, and you can make manual changes, recalibrate, or change other settings and then resume tracking.  To end tracking, switch to the Nova program and exit.

 
Tracking with MoonSked
Note Version 5 of DrzTrack no longer supports MoonSked due to program size constraints.  If I receive requests for supporting MoonSked I will attempt to find a way to support it again.

MoonSked by GM4JJJ uses the NovaComm serial interface.  In the DrzTrack program setup window, add the MoonSked program and location.  The file name is "DRZCONTROL.exe" (program supplied by GM4JJJ).  Set the data format to NovaComm.

To start tracking, make sure that MoonSked is selected as the tracking program and click "Run".  When the DrzControl.exe program starts, you can use the Utilities/Settings screen to set the proper serial port.  Next click the "Start MoonSked" button.  In MoonSked 's "Preferences" window you can specify that the tracking window will automatically open when MoonSked starts.  Otherwise you will have to manually start tracking from within MoonSked each time it starts.

Once MoonSked is started and tracking, switch back to the Moonsked DrzControl screen and check the AutoTrack ON box. The current satellite and antenna position will now be shown in the window.  You can also switch to the "Utilities" tab and request a reset of the CT-2 controller board, if required.


As with the other direct serial trackers, the DrzTrack program will be minimized and unresponsive while MoonSked is controlling the CT-2 board.  When tracking is ended by exiting the MoonSked DrzControl program, DrzTrack will be restored to your desktop and be available for testing, etc.

 
Tracking with SatScape
Satscape appears to no longer be supported.  There is a 2012 version that runs under Java, but I cannot see how to get DDE strings from it.  If you have version 2.01, it will still work under windows 7 (and probably newer) but it sometimes crashes when closing.  The setup for it is as shown below, but I will no longer support it unless it gets updated and supports the interface needed for DDE.  (If anyone is using Satscape please let me know.)

In the DrzTrack program setup window, add the SatScape program and location.  The file name is "SatScape.exe".  Set the data format to SatScape DDE.

To set up SatScape for DDE, go into the Settings menu and select "Main Settings".  Check the box that says "Rotor/Radio Tracking DDE Auto Start up".  This will cause the DDE window to launch when SatScape is started.  Caution, do not click on the button labeled "Start WISP DDE" in the SatScape dialog box.

When you are ready to start tracking, start communications from the DrzTrack program to make sure the board is operational and movement is enabled.  Use the reset button if necessary.  Make sure the selected tracking program in the tracking window is SatScape, and then click the "Run" button.  The SatScape program will start and tracking will begin.

Now you can switch to DrzTrack, or minimize SatScape so that you can see the DrzTrack screen.  The tracking status message will show that tracking is paused, and it will show the satellite being tracked and the current position as reported by SatScape .  It will also show the current antenna position, and the LED indicators will show motion requests and commands as they are generated to keep the antenna in track.

Note in the screen shot above, SatScape is showing elevation as 40.37 degrees but the antenna is at 45.94 degrees.  The antenna motion indicator shows "Down", indicating that the antenna is being moved to correct the difference.  You may click the "Pause Tracking" button to temporarily stop receiving tracking information from SatScape.  While Tracking is paused, DrzTrack will continue to show the current moon and antenna position, and you can make manual changes, recalibrate, or change other settings and then resume tracking.  To end tracking, switch to the SatScape program and exit.

 
Tracking with TrakSM
Make sure your version of TrakSM is version 5 or newer.  In the DrzTrack program setup window, add the TrakSM program and location.  The file name is "Trak_SM.exe".  Set the format to TrakSM DDE.

Bring up TrakSM and use the Menu/Setup screen to set the tracking to DDE.  Set the DDE output format to "Nova AZ/EL".  When using DDE, the DrzTrack program continues to communicate with the CT-2 controller via the serial port while tracking, so DrzTrack automatically switches TrakSM to use the DDE mode, even if TrakSM should happen to be set up for serial.

When you are ready to start tracking, start communications from the DrzTrack program to make sure the board is operational and movement is enabled.  Use the reset button if necessary.  Make sure the selected tracking program in the tracking window is TrakSM, and then click the "Run" button.  The Trak_SM.exe program will start and tracking will begin immediately.

Now you can switch to DrzTrack, or minimize TrakSM so that you can see the DrzTrack screen.  The tracking status message will show that tracking is paused, and it will show the satellite being tracked and the current position as reported by TrakSM.  It will also show the current antenna position, and the LED indicators will show motion requests and commands as they are generated to keep the antenna in track.


Note in this screen shot, the current Sun position is showing elevation of 33.7 degrees but the antenna is at 34.74 degrees.  The antenna motion indicator shows a down arrow, indicating that the antenna is being moved to correct the difference.  You may click the "Pause Tracking" button to temporarily stop receiving tracking information from TrakSM.  While Tracking is paused, DrzTrack will continue to show the current position of the tracked body, and current antenna position.  You can make manual changes, recalibrate, or change other settings and then resume tracking.  To end tracking, switch to the TrakSM program and exit, or simply exit from DrzTrack.

(Note: TrakSM will not send any tracking information if the target is below the horizon.  TrakSM can also be set up for a polar antenna mount and the CT-2 controller will work with that.  Full details have not yet been written up, but click here for an informative article by W4OP about Polar Mounts.)

return to top
return to DrzTrack Page